Export & Test a DLL with Visual Studio 2013
My mission: create a struct in Visual C++, export the struct via a Dynamic Link Library (DLL), and test the struct's methods in a Unit Test Project within Visual Studio 2013. Sounds simple enough right? Of course it isn't. Let's go through the motions, in case I can save some poor soul's time in the future.
I started with an Empty C++ Project...

...and built a basic BankAccount struct. Here's the bank.h file:
And here's the bank.cpp file:
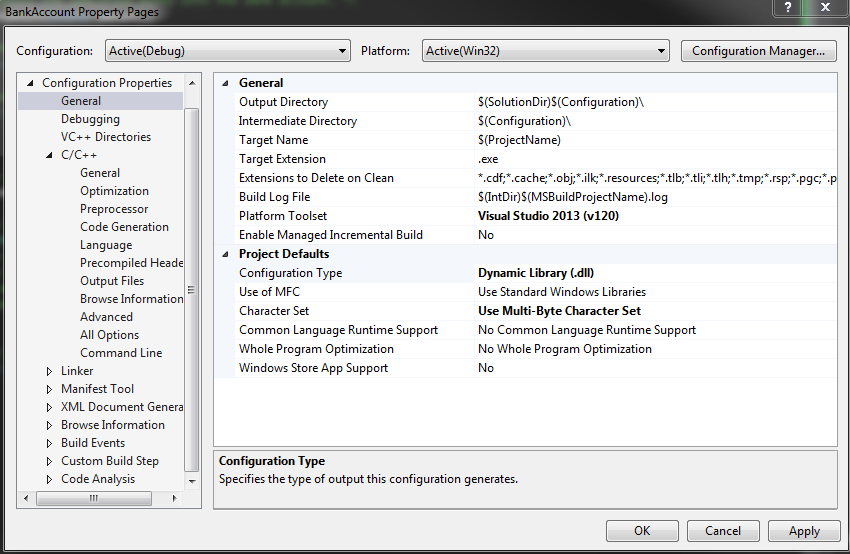
To build this as a DLL, you have to go into the project's Properties. I get there by right-clicking on the solution file in the Solution Explorer, and left-clicking on the last item (which should be called "Properties"). Clicking on General within the Configuration window should lead to a screen like the one seen below, in which you will set the "Configuration Type" to "Dynamic Library (.dll)".

Building the project at this point will give you a DLL, (typically located in the project's Debug output folder). However, if you tried to straight up import this DLL in another C++ project (as I was trying to do) and reference its contents (by importing the BankAccount struct, for instance), you will get all kinds of errors. The errors stem from the fact that the project into which you are importing the DLL does not know how to resolve the symbols that identify the struct or its methods. When all is said and done, you need to essentially tell the new project how to make sense of the previously declared items. For this, I had to do several things.
Step 1
Go back to the original project, and add the following preprocessor related information to the bank.h file:
The key part of the above Gist relates to the #ifdef ... #else ... #endif bit. In this conditional macro, I'm stating that, if this project defines the macro variable BANKDLL_EXPORTS, then all references to BANKAPI should resolve as __declspec(dllexport); this latter value tells the compiler to make available the subsequent symbol (be it a struct, class, or function) available for use. Something that is not obvious from the online help forums is that (perhaps now quite obviously) you need to actually define the BANKDLL_EXPORTS macro variable somewhere. The place to do it is in the project's Properties, under the C/C++ > Preprocessor menu item, as shown below.

In this menu, we have to write in the variable BANKDLL_EXPORTS in the Preprocessor definitions field. Now, all references to BANKAPI in this project will resolve to __declspec(dllexport), which means that this is the project doing the exporting. Whenever another project imports the bank.h file, it will attempt to find a BANKDLL_EXPORTS variable, and (hopefully) fail, which means that we're importing (since BANKAPI will resolve to __declspec(dllimport)).
Step 2
In the other project (which for me was set up as a Native Unit Test project), import the bank.h file, as follows:
Step 3
In the other project, add the BankAccount DLL and the LIB files (which should be automatically exported when you build a project as a DLL) as References for the test project, as illustrated below:

Step 4
In the other project's build directory, add the BankAccount DLL and LIB files so that they're exposed to the project during runtime, as illustrated below:

Note: The above steps allowed me to run the unit tests within the editor.
Hope it helps!